Thursday, January 31, 2013

Mom to the Rescue!

God bless my mother, who came over this morning and pinned like a mad-woman after I ripped out the offending seam and zipper. After undoing the lining and zipper, I've gone from this horrendous wrinkle extending from center back towards the zipper...
to this minor wrinkle...which I also discovered is due in part to my protruding scapula, which pushes the dress down. When I pull the dress up there, the wrinkle completely disappears. I may be applying double-sided tape to my scapula...
That took from about 8:45 AM to well after lunch, though I did pause for phone calls, etc. And I haven't addressed the tiny blip at the bottom of the zipper, but I'll get that done tomorrow. Now if only I could sew the lining back down and hem the dress, then go buy shoes and a bracelet to match, I could actually wear it tomorrow night. But alas, it'll probably have to wait till the Saturday before Fat Tuesday to be worn.

Off to browse DSK for gold strappy sandals...

Wednesday, January 30, 2013

And Now The Usual Depression...

because of a couple of issues. First the zipper, but I'm over that. I took out the hand-stitching, undid the lining, and did more of an invisible zipper app with stitching much closer to the teeth. I didn't have the stamina to undo the whole thing and apply interfacing, but you can bet next year I will if I make another dress! Thank you ladies for that tip.

No, the depression came after I saw that the back lining rolls out, which I think I can fix by tightening that up inside, and if I can't, then it'll just be a design element to show off my pretty blue lining!
The main problem is the terrible wrinkling around my back (artifically lightened pic - look in the shadows of my shoulder blades - wait, isn't that an Eric Clapton song?), which I thought I got rid of with my swayback adjustment. Something happened in between fittings to bring them back, and I'm not sure what. I don't think my hand-stitching the lining down did it, so I have to investigate the zipper again. I made an attempt to undo the lining there to see if I can pull it up, but it affects the whole zipper.. Thus, the depression.
So I hung it up, took a 30-minute nap, then went to Pure Barre, where the combination of anger at my shortcomings and hard techno music resulted in quite an ab workout - hooray! And on top of that, I'm so angry at my middle-age belly fat that I ordered the "low-carb option" at dinner tonight, which said it was going to be side salad and broccoli instead of fries, but also meant no bread for my patty melt. And I drank water! So now to go have that one glass of wine...not two...that means more belly fat.

Tuesday, January 29, 2013

My Hand-Puckered Zipper

Well I'm apparently not a natural at hand-picking a zipper, as evidenced by the puckers on the left side. I've taken that out and I think I honestly have to put the dress on the form to sew this correctly. Maybe Katrina from SusieHomemakerMD has a tutorial to recommend?
And in case I do this again, here are pictures of my zipper and lining for my Mad Cow-riddled brain. I just turned the lining under and held it against the zipper, then pinned that, as you can see by the turned in segment near the top.
Then I turned the dress inside out via this hole here, and located my pin. Seriously, people, I tried this for 30 minutes without the pin and constantly got lost in the lining, etc.
I stitched the lining to the zipper tape, then turned it right-side out again. Again, I got lost and nearly sewed the same seam twice, then I found my other pin, then I couldn't find the right opening to get the dress and lining right-side out. Sheesh!
And just a final picture of my handstitched bodice lining finally done. We'll ignore the terrible armscye part (there was no way those 2 pieces of fabric were going to match, so I just added tucks ad lib and did some creative ironing) and revel in the beautiful blue slippery-ness of it - whee!
Next up, another attempt at hand-picking and hemming. OH! That reminded me - I don't trust their hemming instructions dealing with the slit, because the shoulder seam instructions said to put right sides together, stitch the neckline of the lining to the fashion fabric, as well as the lower armscye curve, open out the shoulder seam lining and fashion fabric, sew one continuous seam, then fold the lining down. Turn right-side out and press. Okay, that was confusing, but when you do that, you've created a Moebius strip and there's no way to turn it inside out through the shoulder. You have to turn it right-side out FIRST, THEN put the shoulder seams together and sew, etc., etc. I realize I've said that badly - I'll try to include a picture at some point. Again, this pattern has several issues!

Sunday, January 27, 2013

Sunday Dress Update

Continuing with the excruciating details, here's how stretched out the front neckline was because I didn't stabilize it first.
I used Sandra Betzina's tip for using the selvage as a stabilizer, but I got a little carried away with it on the back.
And I decided to add an inch above current bodice to help cover that left boob that doesn't have a shoulder strap, so I re-drew the pattern and took the bodice lining apart (yes, I had to remove boning and redo it - yay me) as well. That was a couple of hours last night.
So here's a very rough estimate of what I had today. I just sewed the real bodice (with handstitched underlining) to the lining with boning and turned it inside out to see if I was anywhere close. This is NOT trimmed, pressed, or anything.
I might actually pull this off!
Uh, well, after working out some issues. I NEVER get a bodice and lining to match up on the first try...EVER. And don't even get me started on sewing the final shoulder seam. The instructions are screwed up again, and I just got back from my mother's house, where we figured out the boo-boo there. That'll wait for tomorrow.
For now, let's enjoy the one perfectly-matched seam I made - I mean PERFECT (though un-ironed)!
Happy Sunday!

Saturday, January 26, 2013

Is an Elastic Strap a Crime?

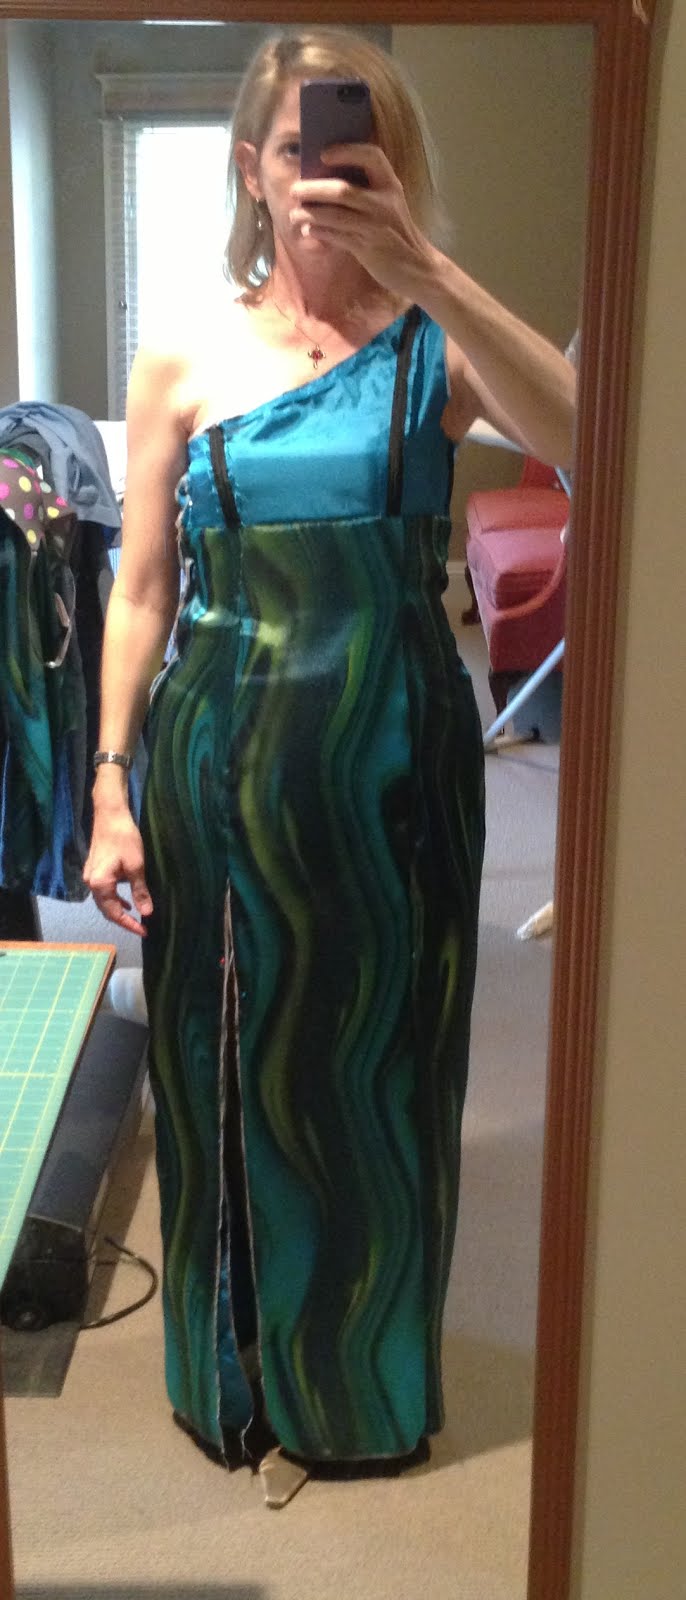
Again with the poor lighting! One day I'll have a mirror in an area with good light and a good camera. Until then, forgive my glowing shoulder....which leads to my main problem currently. The boning wants to sag and barely covers my bra.
Especially with the lined skirt attached, I have to keep pulling it up, and it didn't hit me until this morning that I should have stay-stitched or stabilized the necklines since they're on the bias. I was thinking I needed a tuck there, but then it occurred to me - not in the instructions, though they DO mention stay-stitching the front sides where the princess seams are. I think this pattern needs a couple of tweaks!

Oh, and what do you think about the shoe? Silver didn't go since the fabric has gold glitter over it, but is this too much going on with the ballerina ankle strap? But wait, I AM a ballerina of sorts (another annoying Pure Barre reference here).
Bad picture of the back of dress - these shoulder blades are registered as lethal weapons, and they do NOT lay flat.
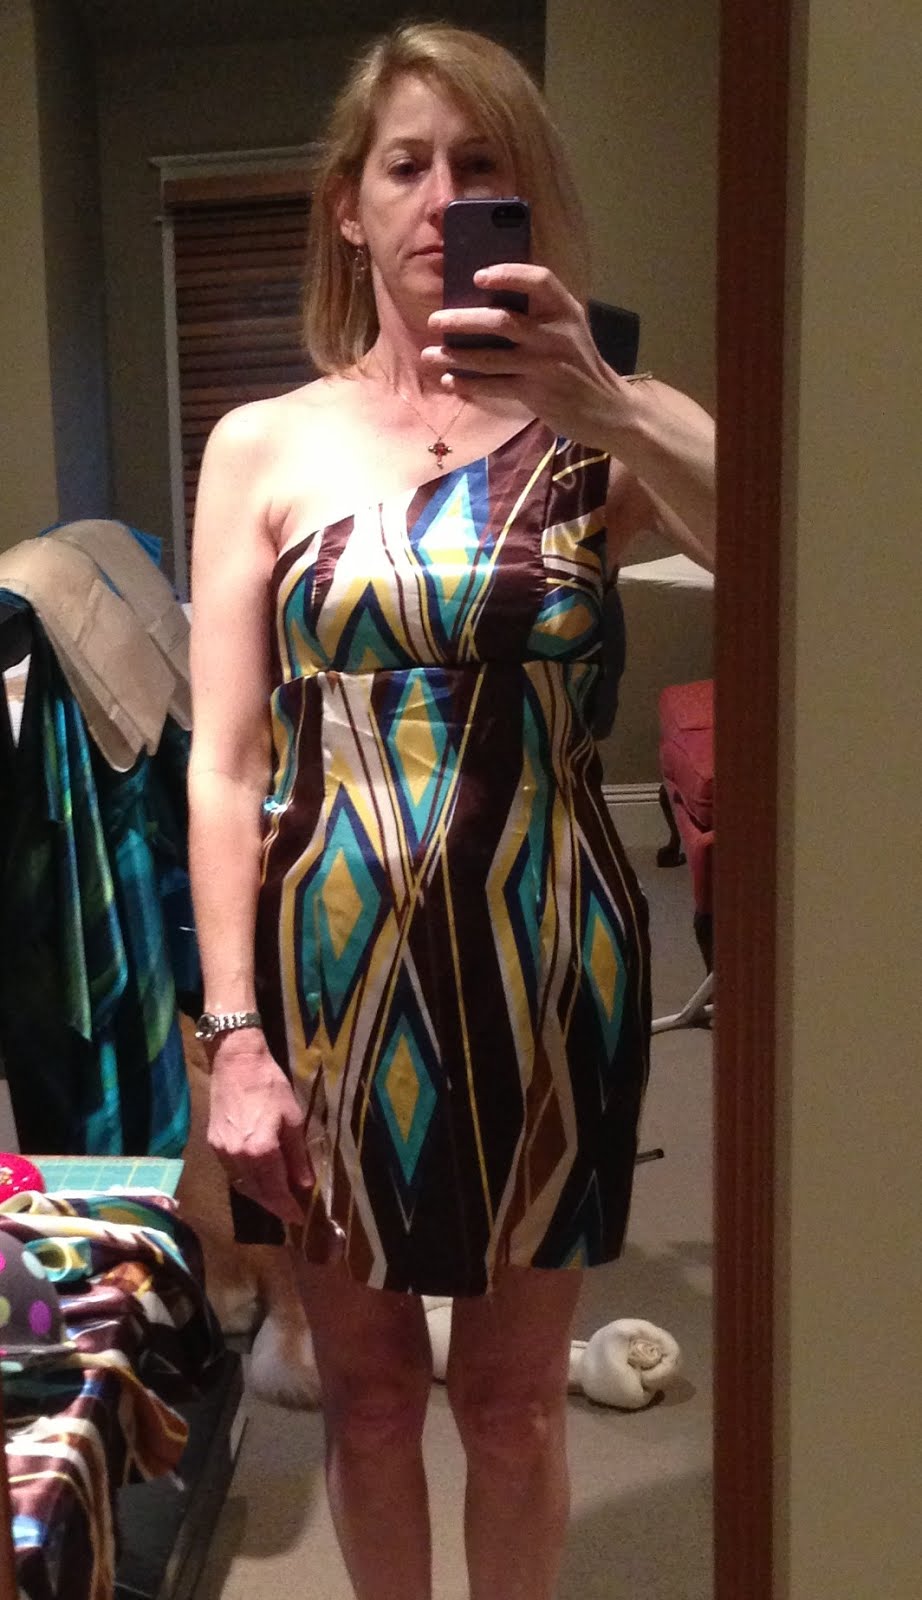
Took care of the swayback with a 2" raise of the skirt when attaching to the bodice, which I've just basted together, by the way, so I can judge how to cut the real bodice.
Another frightening view of chest, which brings me to the title of the post. Is it wrong to find one of those clear elastic-y straps to hold this side of the dress up?
I've seen other women with off-the-shoulder dresses have that strap on the free shoulder, but is that only for pageants? The few PR-er's who've made this pattern didn't make this view. Otherwise I was thinking of lengthening the boning by an inch in front, or trying the other bodice that has a bikini-style top with narrow straps, though I wanted to avoid the rib cleavage of that one, plus even the line drawing of it emphasizes the hips. Your thoughts?

In other news, may I just say that I LOVE Nikki Minage on American Idol? She is kind to the contestants and approaches them from an angle of how they can be an inspiration to other people like them. And IMHO, Mariah Carey is a narcissistic Bee-Yotch! I have a hard time watching it because of her. With that off my (poorly covered) chest, I'm back to sewing.

Friday, January 25, 2013

The First Major Boo-Boo

So here's the muslin you saw last...note the slit in the front left of the dress - your right - hard to see, I know. The right side of the dress is facing out, but that side should be against me if I understand linings correctly.
Oh, here's the boning in place. Now boning comes rolled in a box - anybody know how to get it to lose it's rolled up shape? (Though it may work to my advantage if turned the right way - hubba hubba!).
Now here's the muslin bodice pinned to skirt to check the fit. I thought I screwed up and basted the right side of the bodice to the wrong side of the skirt, but see the seams and boning are on the outside, so that's actually the way it's supposed to go. So why did I think that?
Because the left front slit is in the back! Now when I saw this, I thought I basted it together wrong. I did take the boning off the side seam to let that out some and then reattached it, so that's not going to be pulling hopefully.
I got the real skirt cut out and went to sew it to the lining, and that's when it hit me that this is all screwed up. So I went back and read the instructions again: you sew the skirt pieces right sides together, leaving open the left front...OHHHHHH! The drawing has the RIGHT front left open for the lining, even though they say LEFT front in the instructions - DOHHHHHH! And the reason I can't just unsew the other side is because the zipper is on the wrong side too, and the diagram is wrong there too. Aye-yie-yie (I don't know how you spell that - I think it really starts with a capital F!).

So my options currently are to just make the wrong side of the lining the inside of my dress, which will show somewhat because of the large slit. Or I have to unsew the right side for the zipper and the slit, then sew up the other side I left open.

Okay, I think I can wrap my head around that. It just means lots of ripping of serger stitching, but there's nothing irreversible...I don't think.

So I didn't quite get the picture of the beautiful matching job I did with the real skirt because of this fiasco, but hopefully I'll get it all straightened out tomorrow - big sewing day! And any thoughts or tips you have are welcomed...

Wednesday, January 23, 2013

Fitting - Done!

Thank you ladies for your excellent advice! I had used a 5/8" seam allowance, so I figured instead of re-cutting a larger skirt, I'd just serge the seams and remove the basting (clever girl!), effectively adding about 3 inches in circumference. Here's the result in very poor lighting.
Here's another shot in softer but still poor lighting. No more off-kilter seams and I can breathe...always a plus. Pay no mind to the ragged side - that's where I pinned the zipper opening.
And just a bit of swayback which I can fix when I attach the skirt to the bodice by pulling it up a bit at that seam.
Here it is from the side. This particular print would NOT be good to seam like this, but I'm thinking that with careful placement, my wavy fabric will be fine.
So with fitting out of the way, I was able to get the lining all cut out and sewn up halfway. Since I serged the skirt seams, I'll have to take in a bit near the top to get the bodice to match up with it's non-serged seams. I just pinned these to the dress form to see how it looks. I love that color!
And I started on the boning - woohoo! It's quite exciting to use the zipper foot and cut the end of the boning to round it off a little. I saw that Sandra Betzina had a tip in her recent book to burn the end of it with a match to soften the sharp edges. Interesting...but how do you keep from setting your dress on fire? Just checking to see if you're still awake!
So I'm well on my way. Maybe I can get the real fabric ready for cutting out soon, though that'll take lots of playing with first...

Tuesday, January 22, 2013

Who Needs a Laugh?

Well, here's the muslin thus far of McCall's 6283, which will be a full-length Mardi Gras dress. Full disclosure, right? Hey, that's kind of cute...uh...well...
Now to be fair, this is the 3rd bodice but the 1st skirt, so that's my excuse. I went from a 12 bodice to an 8, then had to add back an inch at the shoulder strap. Hmm, it's too tight below the bodice, and are those princess seams pulling off to the right (your left)? What the....? I'm thinking off-grain myself, people.
Jeez, this thing's too tight! Helluva swayback, made worse by being too tight over the hips. And the print does wacky things, obviously.
Yeah, I can't even pin up where the zipper goes on the side seam because it's so tight. How ridiculous to be a size 8 up top and needing more than a 12 below. But that's why we sew our own clothes, am I RIGHT?!
Back to the drawing board....

Monday, January 21, 2013

Belly Dancing Gift

I forgot to show you something my sister gave me - it's some sort of belly-dancing skirt. Here's a close-up...
And now it will be demonstrated by my sister - too bad there's no sound so you can hear how pretty it is...and how out of breath she gets!

Sunday, January 20, 2013

Pure Homemade Barre

Just a quick gloat before I head to Pure Barre then work on the dress. I wore this to PB Friday - my homemade shirt, leggings, and my knitted shrug. When I walked in, the receptionist (same one who liked my shrug a few months ago) said, "Whoa - cool leggings! Where'd you get those?" I said, "Oh, thank you! I made them." She said, "You did NOT. How would you MAKE cool leggings like that?" I said, "Well, you buy cool fabric at Hancock's, then you sew them up." She said, "Oh, so you used a sewing machine? Cool!"
I'm not sure how else I would've made them...maybe people think sewing machines are only for making homemade dresses and stuff. And speaking of homemade dresses, I've checked the fit of the bodice pattern with my muslin, which is a geometric print, and it doesn't look bad, so I'm going ahead with the real stuff once I check the skirt fit. Have a great Sunday!

Thursday, January 17, 2013

Help!

Oh no! I bought my pattern today at the $1 McCall's sale, and it hit me that there are princess seams in the front and back. But here's my fabric draped on my dress form.
Long curvy lines that don't want to be thrown off by seams...I'm trying to hold it out for you.
So I'm thinking that I may try and pin the skirt pieces together to get one big piece, then it hits me that the bodice will be jacked up with seams too. So maybe I'll pin the pieces together and cut one big piece? The back looks fine...
Oh crap, there's no way the front is going to work with the bust shaping.
Any of you dressmakers have any advice for me? Add some darts to the bodice instead of the princess seams? What will that do to the boning? I figured I'd still cut the lining with seams to keep that part the same. Abandon this pattern-fabric pairing altogether and find another dress style? Watch reruns of Project Runway to see if I can learn draping really quick?

On a lighter note, the pattern is cute - it has this whole page about sketching your design and trying different fabrics and trims on your little paper doll.
And I picked this up for $1 too - remember this is the dress I wanted to buy from the show, but they changed it in the store and it was a ridiculous price, if I remember correctly...
And finally, my precious and gainfully employed oldest son. It took a long time, but he finally found a job - and he's happy! How awesome is it to have a happy teenager in the house?!
Yeah, I'm just stalling. Back upstairs to think about this dress... Yeah, I thought about it - am I making too big a deal out of adding seams and throwing the print off a little bit?

Monday, January 14, 2013

Leggings Done

Alas, I won't be pulling off Sheila's look until I find some boots that really fit...
but I think THIS will work! I'm going for Olivia Newton-John at the end of Grease, but she's gotten a job in an office - HA!
And see this?
This is a 4-stitch cable pattern from my book, but it's a little small to be a rag. I made a boo-boo about halfway up. You definitely can't set a cable pattern down and go to bed without marking where you left off.
And I finished the sweater front, but I wanted to make long sleeves instead of 3/4 sleeves, so I checked Lion Brand for similar patterns I might substitute a long sleeve from, and guess what? They have another sweater with supposedly long sleeves, and it's the EXACT SAME pattern as mine! It's called something different and has a different number - what's up with that?! Wouldn't you be upset when you finished that, thinking you're making a regular sweater? I emailed them and am awaiting a reply, otherwise I'll have to measure and alter the pattern, and that will only end badly.
But that'll have to wait a bit because now I've got to work on THIS:
All it took was a little encouragement from Pam and Becky (thanks guys!), and I was off to Joann! Guess I better learn how to sew in boning...and what underlining is all about. We now pause for homemade potato chips from Dean - yum.